Install Tensorflow-GPU in 5 mins!!
Introduction
If you're serious about machine learning, you really want to be utilizing as much processing power as your machine is capable of outputting. In this post I walk you through the process of installing Tensorflow-GPU via the Anaconda Distribution. Tensorflow-GPU allows you to take advantage of your GPU and perform powerful parallel computations. I'm using a Windows 10 machine. However, if you're running macOS, aside from one command, the process is identical. I have also put together a video tutorial if you would prefer to follow along that way.
Please Subscribe!
Installing Anaconda - Step 1
You will need to install Anaconda to follow along with this tutorial. I recommend you download the Python 3.7 version. If you already have Anaconda installed, go to step 2.
Anaconda can be downloaded here:
https://www.anaconda.com/distribution/
Running Anaconda - Step 2
After installation has completed, search for anaconda navigator in the windows search bar. We're going to be using the anaconda prompt, but first you will need to run anaconda navigator. The navigator goes through a setup process upon startup. When anaconda navigator launches successfully, close it. Now open Anaconda Prompt. You should see a command line tool. This is what we'll be using to install Tensorflow-GPU.

Creating and Activating A New Environment - Step 3
To avoid our Tensorflow GPU installation conflicting with other python environments. I highly recommend creating a new environment. This is easily done. If you'd like to learn more about python environments and why we need them, click here.
You can create a new environment with the following command. After -n is where we specify the environment name. This is followed by the version of python we want to install. I recommend v3.7.

We then need to activate our environment. The commands differ slightly between Windows and Mac. After entering the command, you should see that (base) has now changed to (your environment name). This means that any commands entered from this point on will be executed within that environment.
Windows:

Mac:
Installing a Python Kernel - Step 4
We need to create a Python Kernel inside of our environment so that we can run our code. Anaconda used to create a kernel by default. However, this is no longer the case, so we must do it manually.
First we need install ipykernel:

We now need to install a kernel. Again, make sure you have activated your environment, (gputest), in this case. To install a kernel, enter the following command. The variables after '--name' and display-name will need to be set to the name of your environment. If entered correctly, you'll see a response 'Installed kernelspec'.
Installing Tensorflow-GPU - Step 5
This is very straight forward and requires one simple command. The beauty of using Anaconda to install Tensorflow-GPU is that it takes care of all the complicated stuff for you. Anaconda installs everything you need, including cuDNN and cudatoolkit. Look no further. This can take a while because it install a number of libraries.
That's it!
You have now successfully installed Tensorflow-GPU to a brand new python environment. We can test to see if everything is working using Jupyter Notebook and Keras.
GPU Detection Test - Step 6
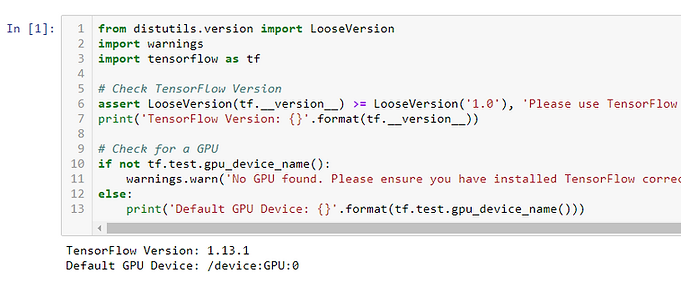
We can test to see if our GPU is working by running a simple script. You can download all the necessary files here:
To run the test, you will need to conda install Jupyter, and pip install Keras. It is important that you pip install Keras. If you conda install Keras, it will downgrade your tensorflow-gpu package and may cause issues.
After installing Jupyter and Keras, we can now launch Jupyter Notebook with the following command:
Copy the download files into your environment directory. You will need to do this via your OS file system. For example my file path looks like this:
Now navigate to the filepath inside of the Jupyter Notebook server. Open the notebook named ''tensorflow-gpy_detection_test.ipynb'.

Now navigate to the filepath inside of the Jupyter Notebook server. Open the notebook named 'tensorflow-gpy_detection_test.ipynb'.
Make sure you are using the correct kernel!
This is where most people go wrong. After opening the notebook, look at the top right of the screen. Ensure you have the correct kernel selected (i.e. the kernel we just installed to our environment.) If your kernel is not correct, you change kernel manually as shown below.


The first code cell begins the GPU detection test. You can execute the code cell by clicking on it and pressing 'Shift + ENTER'. If everything went well, you should see an output displaying your default GPU device '/device:GPU:0'.

Conclusion
Tensorflow-GPU has always been notoriously difficult to install. My way is the quickest and easiest I have seen so far. Library updates can cause things to go wrong, so be prepared for that in the future! Hopefully you were able to follow this tutorial successfully. If you ran into problems, I suggest going through the tutorial again very carefully. You can also leave a comment below and I will try to help you.
Thanks for reading.
Happy Coding :)

thehardwareguy
Did you find this helpful?
Kindly consider supporting me.
SEO Keywords
how to install tensorflow gpu, how to install tensorflow gpu on windows 10, install tensorflow gpu, best way to install tensorflow gpu, fastest way to install tensorflow gpu, install tensorflow gpu windows 10, windows 10 tensorflow gpu cuda 10, windows 10 tensorflow gpu, tensorflow installation, how to install tensorflow, tensorflow gpu jupyter notebook, tensorflow gpu installation, tensorflow-gpu, tensorflow-gpu installation, tensorflow2, tensorflow, cudnn, tensorflow easy install, easiest way to install tensorflow, easiest way to install tensorflow-gpu, tensorflow-gpu easy install, how to create anaconda environments, creating anaconda environments, how to activate anaconda environment, installing ipykernels, how to install ipykernel, jupyter notebook ipykernel, changing kernel in jupyter notebook,
